Epoxy resin is a wonderful filler, sealer, and sticky for projects and shapes, but how do you apply it properly to get the results you want?
In this article, we’ll walk you through how to use epoxy resin to seal surfaces, create adhesive bonds, and make stunning arts and crafts.
Getting Ready to Use Epoxy Resin
“Getting ready to use epoxy resin” refers to the process of preparing all the necessary materials and equipment before using the epoxy resin for a particular project or application. This typically involves selecting the proper type of epoxy resin, measuring out the correct amount, and mixing it with a hardener in the proper ratio.
It also involves preparing the surface to be coated and making sure that it is clean, dry, and free of any waste or contaminants.

Ensure personal safety
Other necessary steps may include wearing personal protective equipment, such as gloves and a respirator, and setting up a well-ventilated workspace to minimize exposure to fumes.
Nitrile rubber gloves and safety glasses can be found at hardware stores or online, and a fan can help with ventilation. [Learn more about how to use epoxy resin safely]
Prepare necessary materials
Prepare all necessary materials before mixing the epoxy resin to avoid its hardening. Use a paint stirrer to mix the epoxy and keep rollers or brushes nearby for application. An aluminum soda can bottom can be used for small amounts of resin.
Clean the working surface
Clean the surface that will be sealed with soap and water to remove any dirt or dust that could affect the appearance and function of the resin.
Make sure to follow the instructions on the packaging and mix the resin and hardener properly to avoid crusting or cracking.
Apply the resin immediately after mixing and wash off any spills on the skin with soap and warm water.
By properly preparing for the use of epoxy resin, one can ensure that the final product is of high quality and that the application process is safe and effective.
Allow the resin to harden overnight
Different brands and blends of epoxy resin will have different drying times, but most do need not many hours to fully harden. Allow the resin to dry overnight or better 24 hours so it hardens completely.
Check the packaging for your specific resin drying time. You may also apply some heat to the epoxy resin to dry it quickly.
Sealing a Surface with Epoxy Resin
Sealing a surface with epoxy resin involves applying a layer of epoxy resin to a surface to create a protective, waterproof barrier.
Sealing a surface is typically done on surfaces such as wood, concrete, or stone, in order to protect them from water, UV rays, and general wear and tear.
The process typically involves preparing the surface by cleaning it thoroughly and making sure that it is dry and free of any contaminants. The epoxy resin is then mixed with a hardener and applied to the surface using a brush or roller. The resin is self-leveling and will create a smooth, even layer once applied.
Once the resin has cured, it will form a hard, durable surface that is resistant to moisture and other environmental factors.
Sealing a surface with epoxy resin can be a great way to protect and enhance the appearance of various surfaces, while also increasing their longevity and durability.
You can apply it to metal to keep it from rusting or cover a floor or countertop to add a strong safety coating. You can even add paint, mica powders, glitter, or metal block to create different colors and styles.
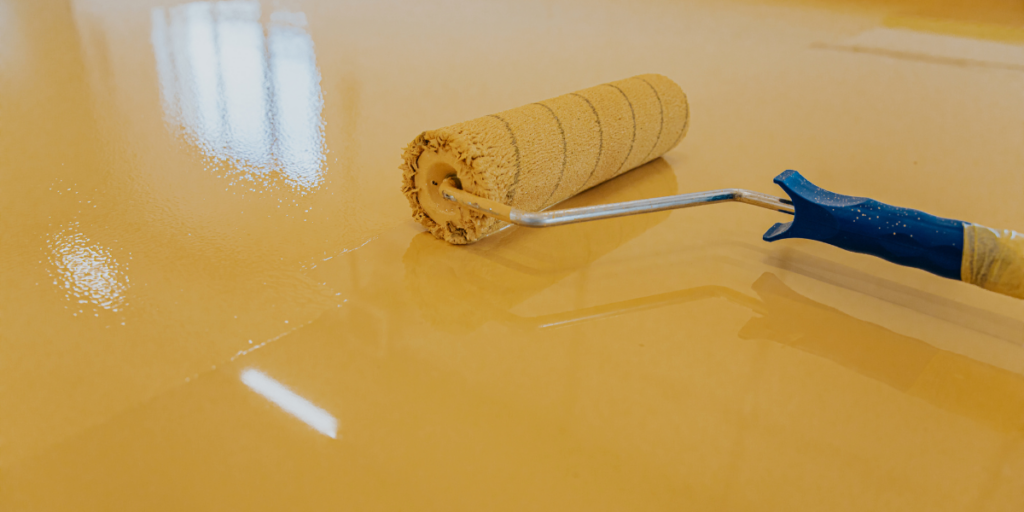
Sealing concrete floor with epoxy resin
Add a shiny, non-stick surface to your concrete floor by applying a thin, even layer of epoxy resin with a spray roller. Use smooth, wide strokes to apply the resin to your floor.
The material will also last longer and is reduced likely to crack with a safety plaster.
Pro Tip: If any air bubbles form in the resin when you apply it, pop them with a pin or a toothpick while the resin is still in liquid form.
Protecting wooden doors and tables with epoxy

Use a foam roller for larger doors and tables, or use a paintbrush to apply a coating of epoxy resin. When the resin cures, it will help preserve the wood and also will add a beautiful shine to it.
The epoxy will also seal the color of the stained wood so it lasts longer.
Filling a small crack in a surface with epoxy
Small cracks in plastic, wood, metal or any other material can be filled and sealed with epoxy resin. Use a toothpick to apply the resin so it just fills the break space.
When the resin cures, the crack will be completely sealed, tight, and waterproof.
Creating a fancy design on the flooring with epoxy

Lay down colored hard or vinyl chips in a pattern and cover them with a layer of epoxy resin. The clear epoxy will allow the colored stone or chips to be seen through the safety and glossy coat.
Epoxy resin also makes the floor surface non-slip.
Add colored quartz or stone entirely to the top layer of epoxy to create a uniform color.
Using Epoxy Resin as an Adhesive
Using epoxy resin as an adhesive involves using a two-part system of epoxy resin and hardener, to bond materials together. This type of adhesive is often used in construction, woodworking, and other industries due to its high strength and durability.
The process typically involves mixing equal parts of the resin and hardener and applying the mixture to the surfaces to be bonded. The surfaces should be clean, dry, and free of any contaminants to make sure of a strong bond.
Once the epoxy has been applied, the materials are fixed or held together until the epoxy cures.
The curing time can vary depending on the specific epoxy product being used and the environmental conditions but typically takes a few hours to some days.
Once cured, the epoxy creates a strong, permanent bond between the materials.
Using epoxy resin as an adhesive can be an effective way to bond in a vast range of materials, including metals, plastics, and ceramics, and can provide a long-lasting and good bond.
Fixing loose-fitting bonding in furniture with epoxy resin

Epoxy works as an adhesive and also fills the gaps without losing any of its power. Brush a layer of epoxy resin onto both of the parts you want to join together, assemble them back together, and allow the epoxy to heal.
For example, you can repair loose-fitting bonds in a wooden chair by applying epoxy to the parts and reconnecting them.
Use a flux brush to brush the epoxy onto the furniture. Make sure the epoxy you use is formulated or safe for wood.
Repairing small things with epoxy resin
A damaged pot, broken coffee mug, jewelry, or loss of the picture frame can all be repaired with epoxy resin. Apply the resin to the ruined areas and reconnect the parts together. Allow it to cure and the item will be fully bonded back together.
The epoxy is also strong, safe to clean, and won’t break down.
Repairing fiberglass with epoxy resin
Small fibers in fiberglass bond very well with epoxy to make a solid joint. Use epoxy resin on models, fiberglass siding, boats, or any other fiberglass items. Apply a narrow layer and allow it to fully cure.
Pro Tip: If you’re using epoxy on fiberglass that is exposed to direct sunlight, like a boat or remote control airplane, apply the resin on the inside of the fiberglass so it isn’t directly exposed to sunlight. Some resins can be degraded by UV lights.
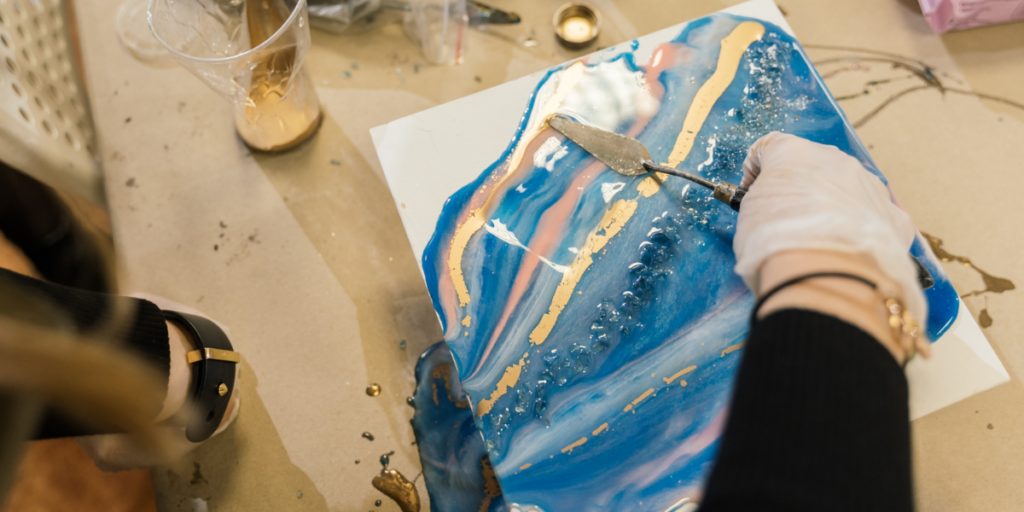
Making Art with Epoxy Resin
Making art with epoxy resin involves using this versatile material to create unique and beautiful pieces of art. Epoxy resin can be used to create a vast range of effects, including creating a shiny, glass-like finish, adding depth and dimension to a piece, and incorporating colors and textures.
The process typically involves preparing the surface or canvas, mixing the epoxy resin with a hardener, and applying it to the surface in layers.
The artist can then add colors, pigments, or other materials to the resin in order to create a fancy effect. The resin is self-leveling, which allows the artist to create smooth, even layers without the need for additional tools or equipment.
Once the resin has cured, the result is a durable and long-lasting piece of art that can be displayed and enjoyed for years to come.
Making art with epoxy resin can be a fun and creative way to explore new artistic techniques and create one-of-a-kind pieces that are truly unique.
Below are some of the ways you can use epoxy in your art.
Place epoxy resin into molds with flowers or insects
You can make clear molds containing flowers, bugs, drawings, shapes, or anything else you can fit into them. Use a mold like an ice block tray, place the items inside of the mold, then fill it with clear epoxy resin. When it cures, you can remove it and then display it.
For example, put a hurry into the mold, then fill it with epoxy resin to create cool insect art. OR use a few different flowers and place them in the mold with the resin to form a colorful scene.
The resin doesn’t break down easily, so your creations will last indefinitely.
Place a picture in a mold to create an epoxy picture frame
Use a round or square mold and place a photograph in the center of it. Pour clear epoxy resin into the mold and allow it to harden and cure.
A square mold will allow the mold to stand on its own when you display it.
Create a custom paperweight with your initials

Use a round mold and cut out your initials using texture paper or foil and place them in the center. Pour clear epoxy into the mold and allow it to cure.
When you remove it from the mold, you can sand the rough side with sandpaper so it’s smooth and can be displayed on your desk as a paperweight.
Pro tip: Write your initials using the calligraphy and cut them out for the desired effect.
Cover a painted canvas with epoxy to create a textured painting
You can create a protective coating that also adds a layer of texture to a painting that you’ve done by brushing on a narrow layer of epoxy. Add thicker layers of epoxy in areas where you want more texture.
For example, you could paint a mountain scene and use epoxy to create a spine where the mountains are.
You can apply the epoxy while the paint is still wet to create a saturated or blended effect.