Are you tired of wearing the same boring jewelry as everyone else? Do you want to stand out from the crowd with unique and eye-catching accessories? Look no further than epoxy jewelry!
Epoxy is a versatile material that allows you to create one-of-a-kind pieces that are sure to turn heads.
In this guide, we’ll show you how to make your own stunning epoxy jewelry from scratch, even if you’re a complete beginner!
- What You Need to Get Started: Our Handpicked List of Must-Have Supplies
- Get Ready to Create: How to Set Up Your Workspace for a Successful Project
- The Perfect Mix: How to Combine Epoxy Resin and Hardener for Optimal Results
- Get Creative: Adding Pigments to Your Epoxy for Unique Jewelry
- Pouring Made Easy: How to Create Gorgeous Jewelry in a Snap
- Let It Cure: Tips for Properly Drying and Curing Your Epoxy Jewelry
- Tips and Tricks for Making Jewelry from Epoxy
- Our Final Words
What You Need to Get Started: Our Handpicked List of Must-Have Supplies
Before you start your first epoxy jewelry project, it’s essential to have all the necessary supplies on hand. Here’s a list of the things you’ll need to get started:
- Epoxy resin and hardener (if you are using the standard 2-part epoxy type)
- Pigments or dyes (optional)
- Mixing cups and stir sticks
- Protective gloves (Check our safety guide while using epoxy)
- Jewelry molds or bezels (you can get it online)
- A heat gun or torch (optional)
- Sandpaper or a polishing cloth
Most of these items are readily available at your local craft store or online. When choosing your epoxy resin and hardener, make sure to read the instructions carefully to ensure you get the right type for your project.
Get Ready to Create: How to Set Up Your Workspace for a Successful Project
Before you start working with epoxy, it’s essential to prepare your workspace properly. Here are some tips to ensure your project goes smoothly:
- Choose a well-ventilated area to work in, as epoxy can emit strong fumes.
- Cover your work surface with newspaper or a plastic sheet to protect it from spills and drips.
- Wear protective gloves to prevent skin irritation and protect your hands.
- Have all your supplies within reach to avoid any interruptions during the project.
- Use a heat gun or torch to remove any air bubbles that may form in the epoxy.
The Perfect Mix: How to Combine Epoxy Resin and Hardener for Optimal Results
To create beautiful epoxy jewelry, you need to mix the resin and hardener in the correct proportions. Here’s how to do it:
- Read the manufacturer’s instructions carefully to determine the correct ratio of resin to hardener.
- Pour the measured resin and hardener into a mixing cup.
- Use a stir stick to mix the resin and hardener thoroughly for several minutes.
- Continue mixing until the mixture becomes clear and free of any streaks.
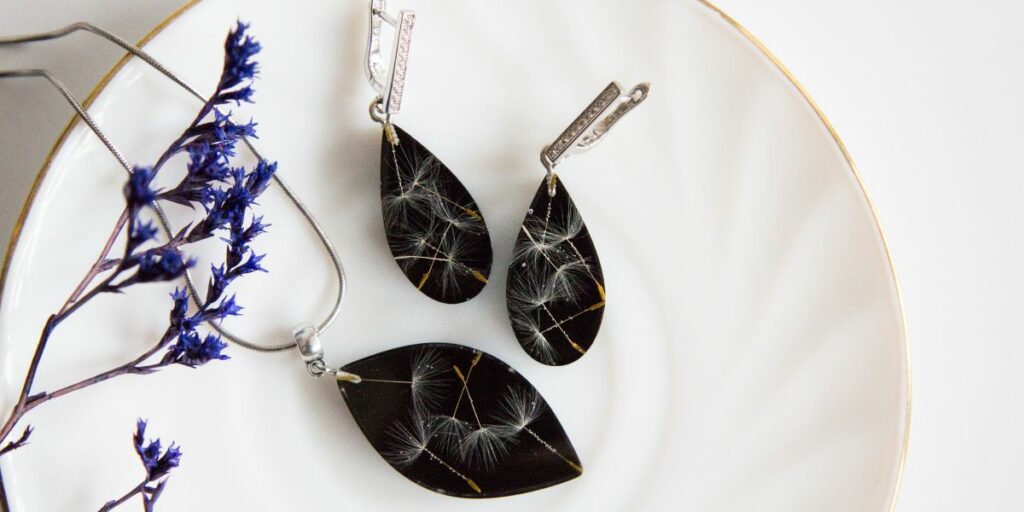
Get Creative: Adding Pigments to Your Epoxy for Unique Jewelry
One of the best things about working with epoxy is the ability to add pigments or dyes to create unique colors and effects. Here are some tips to help you get creative with your epoxy jewelry.
- Use pigments or dyes specifically designed for use with epoxy resin.
- Add the pigment or dye to the mixed epoxy in small increments until you achieve your desired color.
- Mix the pigment or dye thoroughly to ensure even distribution.
- Experiment with different color combinations to create a one-of-a-kind look.
- You can also add glitter or small objects like dried flowers or beads for a unique touch.
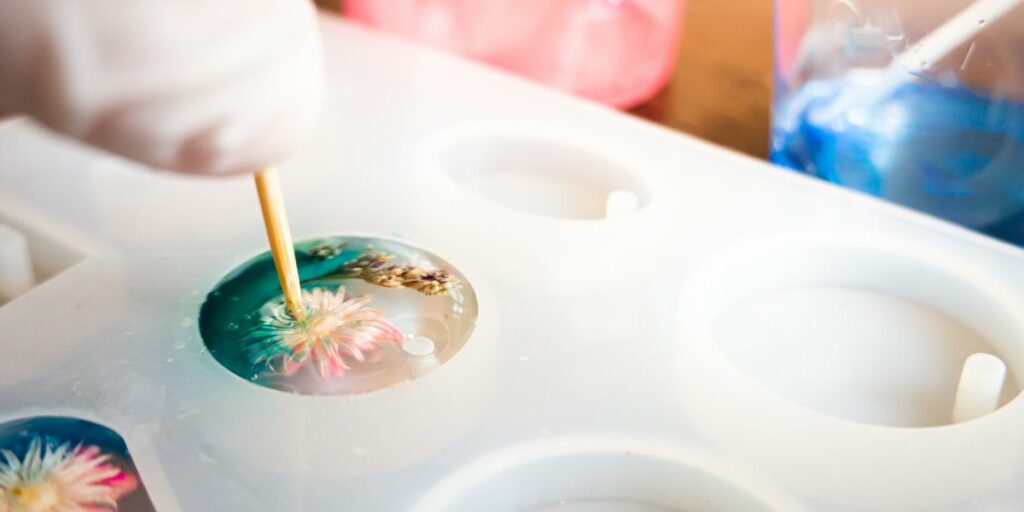
Pouring Made Easy: How to Create Gorgeous Jewelry in a Snap
Once you’ve mixed your epoxy and added any pigments, it’s time to pour it into your molds or bezels. Here’s how to do it.
- Carefully pour the mixed epoxy into the mold or bezel, filling it to the top.
- Use a toothpick or stir stick to move any bubbles to the surface.
- Use a heat gun or torch to remove any remaining bubbles.
- Add any jump rings or earring hooks, to complete your piece.
- Allow the epoxy to cure according to the manufacturer’s instructions.
Let It Cure: Tips for Properly Drying and Curing Your Epoxy Jewelry
After pouring your epoxy, it’s essential to allow the epoxy to cure according to the manufacturer’s instructions, usually 24-48 hours.
Remove the Jewelry from the Mold Once the epoxy has fully cured. If necessary, use a craft knife or sandpaper to smooth any rough edges.
Tips and Tricks for Making Jewelry from Epoxy
- Use a silicone mold release spray to help release the cured epoxy from the mold.
- To prevent bubbles in the epoxy, mix it slowly and avoid whipping or stirring too vigorously.
- Try using a heat gun or torch to remove any bubbles that do form in the epoxy mixture before pouring it into the mold.
- Experiment with different colorings, additives, and molds to create a variety of unique jewelry pieces.
- Practice caution when working with epoxy, as it can be a strong irritant. Wear gloves and work in a well-ventilated area. Check our epoxy safety guide.
Our Final Words
Making jewelry from epoxy is a fun and creative hobby that can produce stunning results. By following these simple steps and tips, you can create beautiful and unique jewelry pieces that are sure to impress.
So grab some epoxy and start crafting today!
Don’t forget to share this guide with your friends.
Let me know your experience in the comment section below. I’d love to hear about your creation.